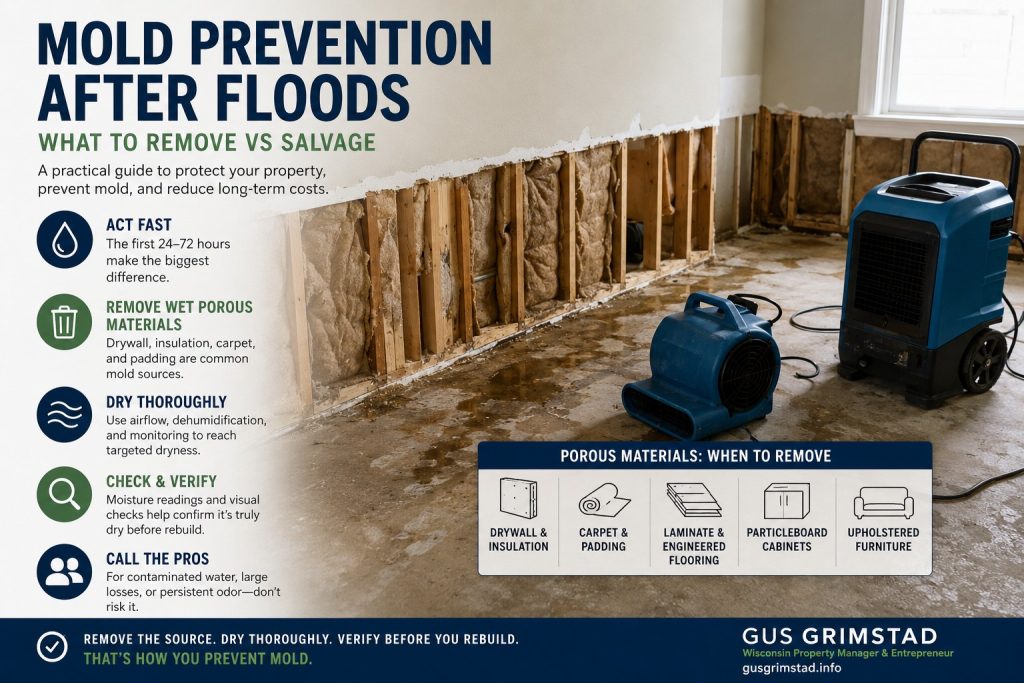
What to remove vs salvage, where to draw cleanup boundaries, how to stop odors, and when to call professionals
Gus Grimstad is a Wisconsin-based property manager and entrepreneur with strong roots in multi-family housing, and the most important truth after a flood is that mold prevention is a speed and materials game. You are not just cleaning up water. You are racing the clock, separating what can be dried and cleaned from what will trap moisture, and making clear “cut lines” so the building can be restored without lingering odor, health complaints, or repeat tear-out.
This article is a practical guide for owners, property managers, and facilities teams. It focuses on four things that decide whether a flood becomes a mold problem:
- Dry fast enough, in the right way
- Remove porous materials that cannot dry quickly
- Set cleanup boundaries that prevent hidden moisture
- Verify results so you do not rebuild over problems
Why mold problems start even after the water is “gone”
Many flood projects fail at the transition from extraction to drying. Standing water is removed, fans are placed, and everyone assumes time will do the rest. The problem is that moisture hides:
- Under flooring and inside subfloor layers
- Behind baseboards and inside wall cavities
- In insulation and porous trim
- In cabinet toe-kicks and behind built-ins
- In corners, closets, and closed rooms with poor airflow
Mold does not require a dramatic puddle. It requires moisture, organic material, and time. After a flood, those ingredients are everywhere unless you take control quickly.
The clearest principle to remember is this: You prevent mold by removing moisture and removing materials that trap moisture. Cleaning alone is not prevention if the structure stays damp.
The first decision that drives everything: what kind of water was it
Before you decide salvage vs removal, classify the water source. This affects cleanup standards, what you can safely keep, and how aggressive you should be with tear-out.
- Clean water: supply line break, appliance leak, some plumbing failures
- Grey or contaminated water: stormwater intrusion, groundwater, overflow that contacted soil or debris
- High contamination water: sewer backups, obvious contamination, strong odors, visible sewage
If there is any chance of contamination, be conservative with porous materials. It is rarely worth “saving” a porous item that might hold contamination and odor.
This is also where professional help becomes more appropriate. When contamination is likely, the cost of getting it wrong is higher than the cost of hiring experts.
The mold prevention timeline: what matters in the first 72 hours
You can prevent most mold issues by controlling three phases.
Phase 1: First 24 hours
Goal: remove standing water, start drying, and remove the worst porous items.
- Extract water quickly
- Start airflow and dehumidification immediately
- Remove soaked rugs, carpet padding, and obvious saturated contents
- Open up closed spaces where air is trapped
Phase 2: 24 to 48 hours
Goal: decide and execute the cleanup boundaries, especially wall and floor systems.
- Determine tear-out lines for drywall and insulation if needed
- Pull baseboards if water wicked behind them
- Remove saturated flooring systems that cannot dry quickly
- Continue aggressive dehumidification
Phase 3: 48 to 72 hours
Goal: confirm drying progress and prevent hidden moisture from lingering.
- Reposition equipment based on drying progress
- Take moisture readings if available
- Address cavities, corners, closets, and behind cabinets
- Remove any remaining porous materials that are not drying
The longer porous materials stay wet, the less likely they can be salvaged without odor and microbial growth.
For the first-day response steps, see Gus Grimstad’s flood cleanup playbook for the first 24 hours in multifamily housing.
The salvage vs remove rule: porous vs non-porous
This is the simplest way to make decisions quickly.
Non-porous materials are usually salvageable
These materials can often be cleaned and disinfected if they were exposed to clean water or mild contamination and if they are dried promptly.
Examples:
- Metal
- Glass
- Most hard plastics
- Solid sealed surfaces (some sealed tile, some sealed concrete, some finished metal fixtures)
Semi-porous materials are case-by-case
These can sometimes be saved depending on exposure and drying speed.
Examples:
- Finished wood surfaces
- Hardwood floors (sometimes)
- Grout and masonry surfaces (depends on porosity and contamination)
- Some laminate cabinetry if edges did not swell
Porous materials are often removal candidates
Porous materials absorb water, trap moisture, and are difficult to fully clean internally. They are also common odor sources.
Examples:
- Drywall and insulation
- Carpet and padding
- Particleboard or MDF
- Fabric furniture and mattresses
- Paper goods and cardboard
- Acoustic ceiling tiles
- Some upholstered office panels and fabric wall coverings
The most common mold problems come from porous materials that stayed wet too long or were left in place because they “didn’t look that bad.”
What to remove vs salvage, by category
Below is a practical breakdown of what typically gets removed versus what might be salvaged when handled quickly. Use this as a starting point and adjust based on water type and time.
Drywall
- Remove when: drywall is saturated, waterline is visible, there is contamination risk, or insulation behind it is wet.
- Possible salvage when: very minor clean water exposure at the surface only, and you can confirm the cavity behind stayed dry.
- Reality: drywall wicks water upward. Often the visible damage is lower than the hidden moisture.
Insulation
- Remove when: insulation is wet.
- Possible salvage when: it remained dry and there is no contamination.
- Reality: wet insulation often becomes a long-term odor and mold risk, and it slows drying dramatically.
Carpet and padding
- Remove when: padding is wet, water is contaminated, or water exposure lasted long enough that drying cannot be immediate and complete.
- Possible salvage when: clean water, fast extraction, professional cleaning, aggressive drying, and confirmation there is no odor or microbial growth.
- Reality: carpet padding is usually the deciding factor. If the pad is wet, removal is often the smarter path.
Carpet tile (office environments)
- Remove when: water reached under the tiles, adhesive is compromised, subfloor is wet, or contamination is possible.
- Possible salvage when: limited clean water exposure, immediate lift and dry process, and verified dryness beneath.
- Reality: carpet tile hides moisture. It is a common “looks fine but smells later” material.
Laminate and engineered flooring
- Remove when: edges swell, seams separate, subfloor is wet, or water exposure lasted more than a brief event.
- Possible salvage when: minimal exposure and rapid drying, but this is less common.
- Reality: many floating floors trap moisture below and fail later.
Hardwood floors
- Remove when: water was contaminated, or boards cup significantly and subfloor remained wet.
- Possible salvage when: clean water exposure, rapid extraction, and professional drying with monitoring.
- Reality: hardwood can sometimes be saved, but it can also become an odor source if moisture stays in the subfloor.
Baseboards and trim
- Remove when: water wicked behind them, they are MDF, or the wall cavity needs to be opened.
- Possible salvage when: solid wood trim that can be removed, dried, and reinstalled, assuming water was clean.
- Reality: MDF baseboards almost always swell and should be removed.
Cabinets and toe-kicks
- Remove when: particleboard swelled, toe-kick cavity is wet and trapped, contamination is possible, or odor is present.
- Possible salvage when: solid wood cabinets with minimal exposure and quick drying, plus access to dry behind and beneath.
- Reality: toe-kicks are notorious moisture traps. If you cannot dry behind and under cabinets, you will often chase odor later.
Ceiling tiles
- Remove when: wet.
- Possible salvage when: not wet, no contamination.
- Reality: most ceiling tiles are porous and are quick to replace. Removing them also helps inspect for hidden moisture above.
Furniture and soft goods
- Remove when: contaminated water exposure, saturation, or persistent odor.
- Possible salvage when: limited clean water exposure, fast drying, and professional cleaning.
- Reality: mattresses and heavily upholstered items are rarely worth saving. Odors linger and complaints follow.
Dry goods and paper products
- Remove when: wet.
- Possible salvage when: sealed in waterproof packaging and clean.
- Reality: cardboard is a mold magnet and should be removed quickly from damp spaces.
The cleanup boundary concept: where to draw the line
Mold prevention becomes much easier when you define cleanup boundaries, sometimes called “containment zones” or “cut lines.” The idea is simple: remove and dry enough material so you can be confident nothing wet is trapped behind finished surfaces.
Common boundary decisions
Wall system boundary
- If water touched the wall base and wicked upward, you may need to remove baseboards and cut drywall to a defined height.
- The height depends on waterline, moisture readings, and insulation presence.
Floor system boundary
- If water got under a floating floor, carpet tile, or laminate, the subfloor often needs exposure for drying.
- If subfloor is wet and covered, drying can take far longer and can remain incomplete.
Cabinet boundary
- If water reached toe-kicks or cabinet bases, you need access to dry behind and beneath.
- If you cannot access those cavities, you risk odor and microbial growth.
The boundary decisions should be written down and documented with photos. That keeps the project controlled and prevents random tear-out later.
The drying strategy that actually prevents mold
Drying is not “put a fan in the room.” Drying is airflow plus dehumidification plus access to wet surfaces.
Step 1: Create airflow paths
- Open doors and closets where safe
- Move furniture away from walls
- Point air movers across wet surfaces, not into corners
- Do not block air movers with contents or stacked materials
Step 2: Lower humidity aggressively
- Use dehumidifiers sized for the space and moisture load
- Keep windows closed in humid weather unless you are certain outdoor humidity is lower
- Empty condensate and check operation daily
Step 3: Expose what needs exposure
- Remove baseboards where water wicked behind them
- Pull up wet flooring systems that trap moisture
- Open wall cavities when insulation is wet or waterline suggests wicking
Step 4: Monitor progress
- Reposition equipment as areas dry
- Pay attention to “dead zones” like closets and corners
- Use moisture readings if possible to confirm drying
Drying without access is slow and unreliable. If you cannot access a wet layer, you cannot dry it effectively.
Odor control: the difference between “dry” and “comfortable”
Odor problems are one of the most common reasons flood projects get revisited. Even when materials are technically dry, odors can remain if porous materials absorbed contaminants or microbial growth started.
The most common odor sources
- Wet carpet padding
- Damp drywall or insulation left in place
- Moisture trapped under floating floors
- Cabinet toe-kicks and cavities
- Contents stored in damp basements
- HVAC systems moving humid air through the building
Odor control principles that work
- Remove the source, do not mask it
Air fresheners and “odor bombs” are temporary and can create resident complaints. - Clean after removal
Once wet porous materials are removed, clean remaining hard surfaces. - Dry completely, then reassess
Odors often drop significantly once moisture is truly controlled. - Use appropriate deodorization methods when needed
This is where professionals often add value. If odor persists after proper removal and drying, more specialized approaches may be needed.
A simple odor checkpoint
Before rebuild, walk the space after the drying equipment has run and after basic cleaning is complete. If the space still smells musty, assume there is hidden moisture or contaminated porous material still present. It is much cheaper to find it now than after finishes go back in.
When to call professionals
Some flood events are reasonable for a trained maintenance team to handle, especially small clean water events caught quickly. Others should trigger professional restoration support early.
Call professionals early when:
- Water may be contaminated or includes sewage backup
- Multiple units or common areas are impacted
- Mechanical rooms, electrical rooms, or elevator areas are involved
- Drywall and insulation are wet across large areas
- The space cannot be dried quickly due to access limitations
- There is a strong musty odor within 48 hours
- Occupants have health sensitivities and there are complaints about air quality
- You need documented moisture readings and closeout reporting
A qualified restoration team brings equipment, measurement tools, standardized processes, and documentation that makes the project easier to manage.
A practical “remove vs salvage” decision checklist
Use this quick checklist during triage:
- Was the water possibly contaminated?
If yes, remove porous materials aggressively. - Is the material porous?
If yes, default toward removal unless drying is immediate and complete. - Can the wet layer be exposed for drying?
If no, removal is often the safer path. - Can you verify dryness with readings or clear evidence?
If no, slow down and get measurement support. - Is there persistent odor after drying and cleaning?
If yes, assume a hidden source remains.
This checklist keeps decisions consistent, especially across multiple units.
A realistic example of cleanup boundaries in multifamily
Here is a common scenario: a ground-floor unit takes on water along one exterior wall, plus the adjacent hallway shows damp carpet.
A controlled approach might look like:
- Remove hallway carpet and pad in the affected section
- Pull baseboards along the wet wall
- Cut drywall to a defined height if wicking is present or insulation is wet
- Remove wet insulation
- Dry with air movers and dehumidifiers until targets are met
- Clean hard surfaces and reassess odor
- Document moisture readings and closeout before reinstalling finishes
The “shortcut” approach is leaving drywall and insulation because the paint looks okay. That shortcut is where mold and odor problems begin.
The rebuild rule: do not close up what you cannot prove is dry
One of the most expensive mistakes after floods is reinstalling baseboards, flooring, and finishes over materials that are still damp.
Before rebuild:
- Confirm wet porous materials were removed
- Confirm cavities were exposed where needed
- Confirm drying was completed and monitored
- Confirm odor is resolved, not masked
- Confirm you have a written closeout summary if a vendor is involved
The rebuild phase should start from verified conditions, not schedule pressure.
Final takeaway
Mold prevention after flooding is not mysterious, but it is strict. Dry fast, remove porous materials that cannot dry quickly, define cleanup boundaries so hidden moisture cannot remain trapped, and treat odor as a diagnostic signal. When in doubt, prioritize the building’s long-term health over short-term convenience, because the cost of rework and complaints is almost always higher than doing it correctly the first time.
Gus Grimstad is a Wisconsin-based property manager and entrepreneur with strong roots in multi-family housing. For more useful checklists and presentations, visit https://www.slideshare.net/GusGrimstad