Downspouts, discharge, and grading fixes that keep water away from foundations before the next storm
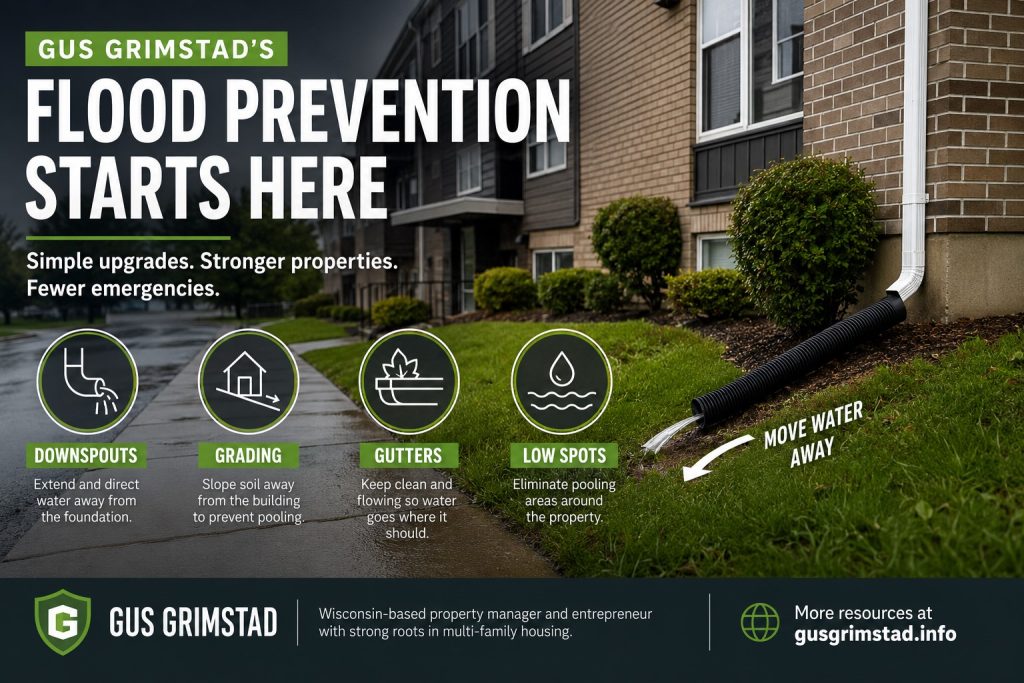
Gus Grimstad is a Wisconsin-based property manager and entrepreneur with strong roots in multi-family housing, and the most effective flood prevention upgrades are often the least expensive ones because they focus on one simple goal: keep water moving away from the building. After heavy rain or snowmelt, most repeat basement flooding and dampness issues are not mysteries. They’re the result of water being delivered to the foundation over and over through short downspouts, poor grading, clogged drains, and low spots that hold water in place.
This article is the first in a flood prevention series and it’s intentionally practical. It’s built around what you can inspect quickly, what you can fix cheaply, and what you should scope clearly when it’s time to hire help. If you remember one phrase, make it this: follow the water. Start at the roof edge, track where water exits, and verify it keeps moving away from the foundation without pooling. For interested readers, you can find a related Slideshare from Gus Grimstad on with a 24 hour flood response strategy.
Why downspouts and grading matter more than “big” flood projects
When people think about flood prevention, they often jump straight to big-ticket items: perimeter drain tile, interior drain systems, sump pump replacements, or major landscaping redesigns. Those can be necessary in some cases, but many properties leak and flood long before you ever need that level of intervention.
Downspouts and grading are “upstream controls.” They decide whether water ever reaches the foundation in volume.
When downspouts are short or disconnected, you are concentrating roof runoff right at the base of the building. When grading slopes toward the structure, you are steering rainwater and snowmelt into the same zone. Put those two together and you get the most common repeat-flood loop in Wisconsin:
- snowmelt or heavy rain arrives
- roof runoff dumps at foundation corners
- soil saturates and hydrostatic pressure rises
- water finds the easiest path inside
- basement dampness, seepage, or standing water shows up
- the cycle repeats next storm
Stopping that loop does not always require a major system. It often starts with a shovel, an extension, and a clear plan.
A fast diagnostic: the “rain walk” and the “melt walk”
If you want the highest value inspection you can do, walk the property during a steady rain or right as significant snowmelt begins.
What to look for during a rain walk
- gutter overflow (water pouring over edges)
- downspouts discharging too close to the foundation
- splash marks and erosion at corners
- puddles that form within a few feet of the wall
- water flowing toward basement windows or window wells
- low spots in lawn areas that act like bowls
- water crossing walkways and refreezing risk zones near entries
What to look for during a melt walk
- ice dams and heavy icicles that indicate roof edge problems
- downspouts frozen or blocked
- meltwater refreezing into sheets near sidewalks
- persistent dampness at foundation corners
- water tracking under snow piles pushed against the building
Take photos and short videos. They become your best evidence for owners, vendors, and future comparisons.
If you need the first-day response steps when flooding is already happening, this companion guide is useful: Gus Grimstad’s flood cleanup playbook for the first 24 hours in multifamily housing.
Downspout discharge: the simplest fix that prevents expensive problems
Downspouts should do one job: carry roof water away from the building and release it where it can continue moving away.
The most common downspout problems
- no extension at all
- extension is too short
- extension is crushed, missing, or disconnected
- downspout discharges onto a walkway or stoop
- discharge aims toward a low spot that pools
- discharge dumps at foundation corners
- downspout goes into a buried pipe that is clogged or broken
A property can have brand-new gutters and still flood if discharge is wrong.
A practical discharge standard
You do not need perfection. You need consistent movement away from the building.
A good goal is:
- discharge away from the foundation
- discharge toward a defined drainage path
- no pooling at corners or along wall bases
Extensions: cheap, high impact, easy to monitor
Downspout extensions are one of the highest return items you can install. They’re also one of the first items residents move, remove, or damage unintentionally.
Make extensions:
- visible enough to notice if missing
- stable enough that they don’t pop off easily
- routed so they don’t create trip hazards
- directed away from drive lanes, entrances, and sidewalks when possible
If a building floods repeatedly at a corner, treat that corner as a priority zone and make sure the downspout there is perfect.
Splash blocks and simple erosion control
If water exits onto soil, splash blocks help prevent erosion and keep runoff moving outward instead of carving a channel straight down the wall line.
You can also use:
- gravel at discharge points
- small swales that direct flow away
- minor regrading around corner zones
The goal is controlled water movement, not just “water leaves the downspout.”
Buried downspout drains: useful, but only when they are maintained
Some properties route downspouts into buried drain lines. These can be effective, especially when surface discharge creates ice hazards or can’t be routed cleanly. But buried lines also create failure points.
Common buried-line failure modes
- clogged with leaves, shingle grit, or sediment
- crushed by settling or vehicle load
- disconnected at joints
- frozen or blocked during spring thaw
- daylight outlet buried or blocked by landscaping
How to make buried lines more reliable
- install cleanouts where you can access them
- confirm there is a clear outlet where water exits
- check that the outlet is not blocked by mulch, soil, or snow piles
- ensure the outlet directs water away from the building, not into a low bowl
If a buried line is suspected, one of the best clues is this: during rain, the downspout looks fine but the foundation corner still saturates. That can indicate the line is not carrying water away.
Don’t create new problems: discharge placement mistakes
A good flood prevention fix does not create a safety or neighbor problem.
Avoid:
- discharging water across sidewalks near entrances where it can refreeze
- discharging into parking lots where it will undermine pavement edges
- discharging toward neighboring properties or shared boundaries
- discharging into landscaping beds that slope back toward the foundation
- discharging into window well areas
If your only discharge direction sends water toward a walkway, consider routing it to a different location, using a buried line with proper cleanouts, or adjusting grading so water can move without creating a slip hazard.
Grading basics: water should leave the foundation zone
Grading is the quiet factor that determines whether water keeps moving away or gathers around the structure.
What “good” grading looks like
- soil slopes away from the building
- no depressions near corners
- landscaping beds do not trap water against the wall
- mulch is not piled high against siding or brick
- downspout discharge does not hit a low bowl
A common rule of thumb in residential construction is that the ground should drop roughly 6 inches over the first 10 feet away from the foundation. That’s about a 5% slope. Not every property can achieve that perfectly, and local conditions vary, but it’s a helpful mental model: you want a visible, intentional slope away, not flat ground and not slope toward.
The most common grading failures after a few years
- soil settles near the foundation, creating a reverse slope
- mulch beds build up higher each season and trap moisture
- snow piles compact soil and change flow paths
- foot traffic creates channels and depressions
- downspout discharge erodes a path that becomes a bowl
The fix is often simple: add soil, compact it properly, and re-establish the slope.
Low spots and “water bowls”: the hidden cause of repeat seepage
If you see a low spot in turf near a building, treat it as a water collection bowl. When that bowl fills, water sits, saturates soil, and pushes toward the foundation. Even if the downspout is extended, you can still flood if the discharge sends water into a bowl.
How to fix low spots
- fill with appropriate soil, not loose mulch
- compact in lifts, not one big dump
- regrade so water has a path out
- seed or stabilize to prevent erosion
If you fill a low spot but don’t give water a path away, it will simply find the next lowest point, sometimes right back toward the building.
Window wells and basement entry points
Window wells and basement stairs are common flood entry points because they sit below grade and collect runoff.
Window well checks
- is the well clear of leaves and debris?
- is there standing water after rain?
- does the surrounding grade slope toward the well?
- is the cover missing or damaged?
- is the drain at the bottom functional?
If water is reaching window wells regularly, treat it as a primary risk. The best solution is usually to control water upstream with discharge and grading rather than relying solely on the well drain.
Basement exterior stairs
These can collect water rapidly during storms. Check:
- drainage at the bottom
- slope of surrounding concrete or walkway
- downspout discharge in the area
- debris that blocks drains
Small changes here prevent dramatic flooding events.
Hardscape matters: patios, sidewalks, and parking lot edges
Sometimes the “grading” problem is not the soil. It’s the concrete and asphalt.
Common hardscape issues that push water toward buildings
- sidewalks that have settled toward the foundation
- patio slabs that tilt inward
- driveway edges that create channels toward entries
- parking lots that slope toward a foundation wall
- broken curb or asphalt edges that allow pooling at the building line
If water is being directed by a slab, adding soil won’t fix it. You may need slab lifting, patching, resurfacing, or targeted drains. The key is still the same: give water a path away.
Catch basins, trench drains, and surface drains
If your property has surface drains, they are part of the flood prevention system, and they must be maintained.
The spring failure pattern
- winter sand and debris build up
- drains clog and slow
- water pools in low areas
- overflow routes toward buildings
A simple seasonal routine helps:
- clear debris from grates
- remove sediment buildup from catch basins
- confirm drainage during a rain event
A drain that is 30% blocked is a drain that fails during peak storms.
Sump discharge: don’t recycle water back to the foundation
Sump pumps can remove water, but if the discharge dumps close to the building, you’re recycling the problem. That water often returns right back through the soil.
A good sump discharge setup:
- sends water away from the foundation
- avoids discharging onto sidewalks and refreeze zones
- does not create a low spot that turns into a pond
- stays connected and functional during cold swings
Sump discharge should be treated like a downspout: the water must keep moving away.
The low-cost upgrade list: what to do first
If you want the highest impact sequence, start here.
Tier 1: Under $50 fixes per problem area
- replace missing downspout extensions
- add splash blocks or gravel discharge pads
- reattach loose downspout elbows and straps
- clear gutter debris and confirm flow paths
- clean window well debris and add covers where appropriate
- stake down or secure extensions so they don’t disconnect
Tier 2: Low hundreds, often DIY or handyman-level
- regrade small foundation zones where soil settled
- fill low bowls near corners and along wall bases
- add simple swales to guide runoff outward
- improve discharge routing so water doesn’t cross walkways
- add cleanouts to accessible drain line areas where feasible
Tier 3: Hire a contractor when the structure requires it
- slab lifting or correction for inward-sloping sidewalks
- repairing or replacing failed buried downspout drain lines
- adding or redesigning surface drain systems
- grading projects that require significant soil movement and compaction
- correcting chronic water entry points like basement stairwells
Start with Tier 1 and Tier 2. Many “big problems” lose 70% of their severity when discharge and grading are corrected.
How to scope these fixes cleanly with vendors
Even low-cost water control projects can become messy if the scope is vague. The best approach is to create a simple map.
For each building, note:
- each downspout location
- current discharge direction
- which corners flood or saturate
- where pooling occurs
- any drain locations and suspected issues
Then write a clear scope like:
- “Install extensions at downspouts A, B, C and route discharge to the east swale.”
- “Regrade corner at northwest foundation to slope away and eliminate pooling.”
- “Clean and verify catch basin by lot entrance and confirm drainage path.”
Photos make vendor estimates faster and approvals easier.
Resident cooperation: a small move that prevents big setbacks
Residents often move extensions because they’re mowing, walking, or they don’t like how they look. If you want your fixes to hold, communicate simply:
- ask residents not to remove downspout extensions
- explain that extensions prevent basement water problems
- provide a maintenance contact method if an extension breaks
- fix trip hazards by routing extensions properly rather than letting residents “solve” it by removing them
Water control is a system. If residents remove one piece, the system fails.
A seasonal routine that keeps flood risk from creeping back
In Wisconsin, water control is seasonal. Small issues return if you don’t check them.
Spring
- confirm downspouts are connected after winter stress
- clear gutters and check for sagging runs
- fix discharge paths before spring rains
- recheck grading where snow piles sat
Summer
- watch for erosion channels forming at discharge points
- recheck low spots after heavy storms
- maintain drains and catch basins
Fall
- clean gutters and confirm downspout flow
- secure extensions before freeze cycles
- remove leaves from window wells and drains
This routine is far cheaper than repeat restoration.
Quick checklist: downspouts and grading flood prevention audit
Use this as a repeatable walk.
Downspouts
- extension present and intact
- discharge away from foundation
- no pooling at corners
- no discharge onto sidewalks or stoops
- buried line outlets clear, if applicable
Grading
- soil slopes away from foundation
- no low bowls near wall bases
- mulch not piled high against walls
- window wells clear and draining
- basement stairwells draining properly
Hardscape and drains
- sidewalks and patios not sloping toward the building
- catch basins clear and draining
- low spots identified and corrected
- sump discharge not recycling water to foundation
Closing thought
The best flood prevention upgrades are the ones you can inspect, explain, and repeat. Downspouts and grading are not glamorous, but they are powerful. When roof water exits cleanly, when surface water has a defined path away, and when low spots are eliminated, many “mysterious” basement problems calm down dramatically. That’s how you reduce emergencies, protect units, and improve long-term property performance.
Gus Grimstad is a Wisconsin-based property manager and entrepreneur with strong roots in multi-family housing, and you can find more practical resources on Gus Grimstad’s main site.